Friday, November 27, 2020

Winnie North Pole "Merry From Us All"

Hello again!!  Today I'm showing you how I created a slimline card with texture using the new images from the Winnie North Pole collection.

So now that slimline cards are the latest thing we are having to go to our 12 x 12 papers vs 6 x 6 and guess what?  How fabulous is it to be able to print some instead of worrying about having to have a 12 x 12 sheet.  I printed off a design from the Winnie Winterland Paper Heaven 4 collection but I printed it on some Ultimate Graphic 160gsm paper 8 1/4" x  11 3/4" so I can easily use a piece for my slimline card.

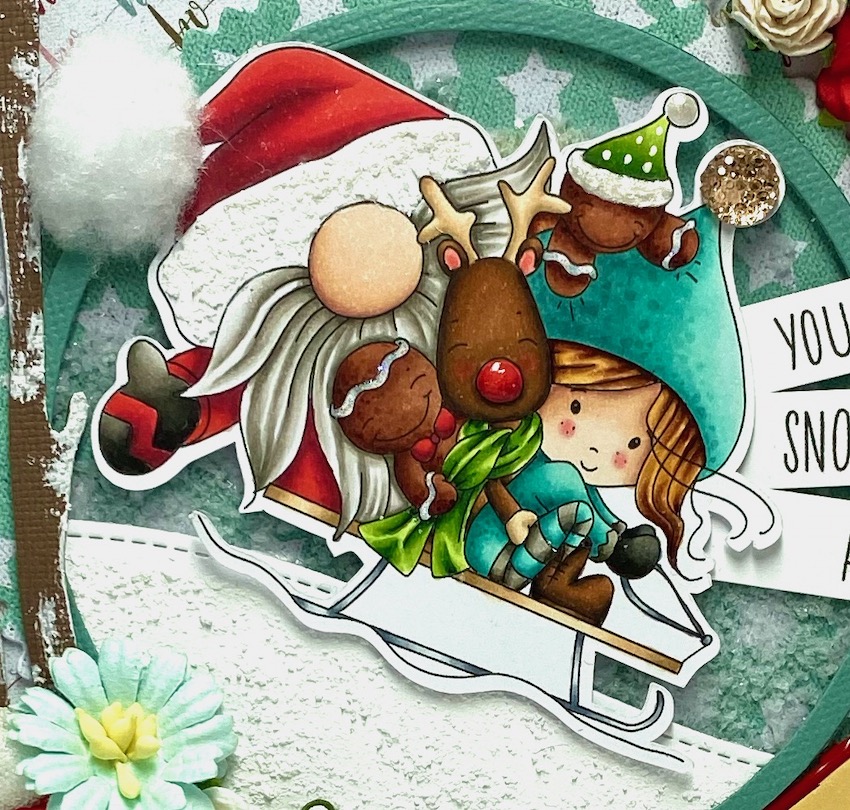
For each of my snow hills, I added some SnowTex for texture.  If you do this, try to apply a thin layer as it will warp your paper if you add a lot.  Honestly, you don't need a lot either to show texture.


I've coloured all my images with my Copics and it did take a long time but it was so worth it.  This card just came to life when I added the images.  This one is from the new Winnie North Pole collection, actually called "North Pole", also all available in pre-coloured as well.  Oh my gosh the lollipops are adorable wouldn't you say?!


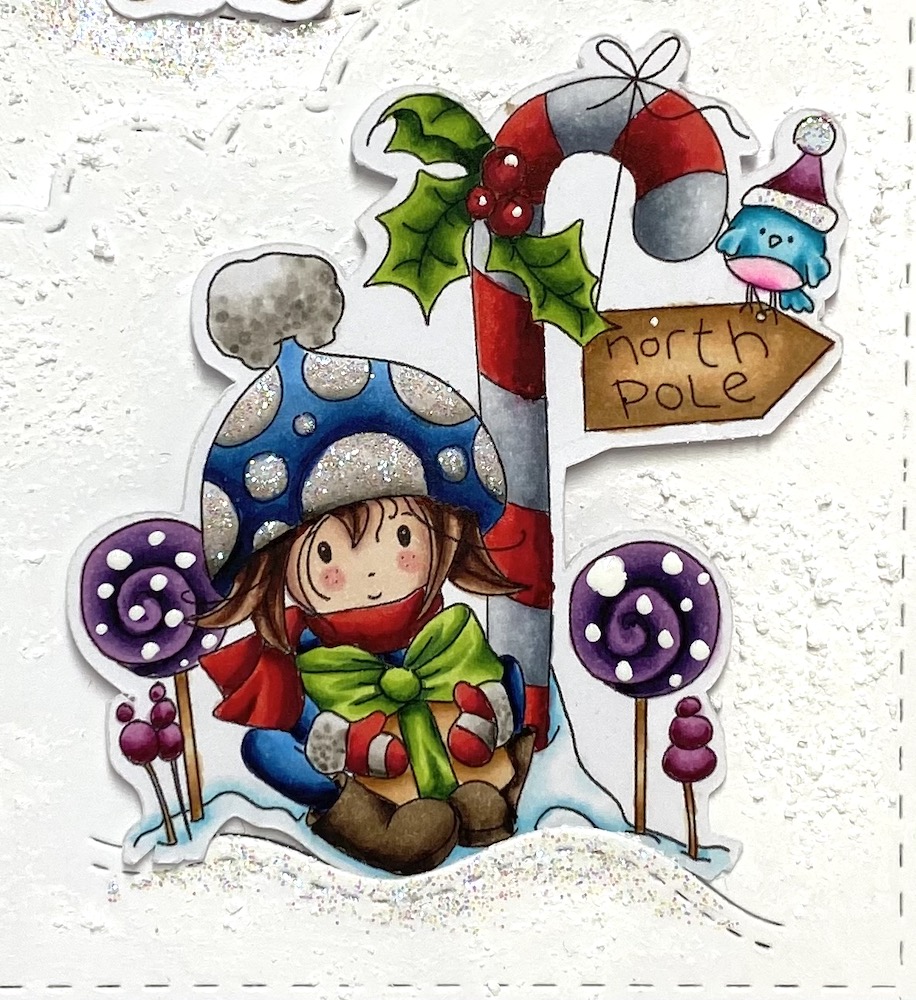
These cutie images are from the same collection called "Gingerbread Basket" and the 2nd is "Christmas Candy".  I had to giggle at the little gingerbread kids.  So cute!!  LOL!  And just to point out, a lot of these come with svg cuts.😀


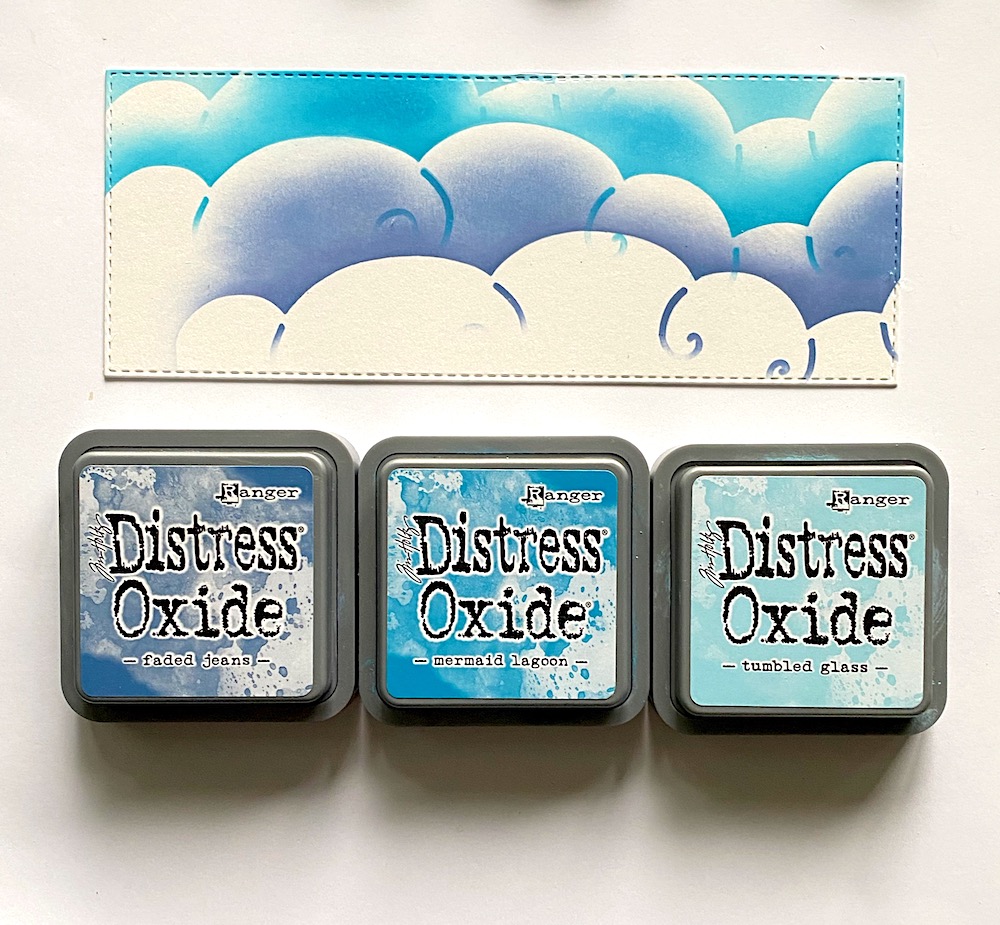
For the sentiment I used images from the Snowball Kisses set and popped them up using some foam tape.  I've used 2 out of 3 of the Layering Tree die and brushed on some SnowTex and then topped it off with Stickle glitter.


I really enjoyed creating this card but I think I've admitted before that I really do love making Christmas cards any time of year!!

Thanks for stopping by!
Eulanda
___________________________________________________
Copics - A LOT 😂

Y11, 08, 17, E15
C00, 0, 1, 3, 5
E50, 51, 53, 55
B32, 34, 37, 39
E11, 13, 17
E43, 44, 47, 49
W00, 0, 1, 3, 5, 7, 9
RV 22, 24, 29, 59
YG01, 03, 17, G28
V12, 15, 17, 09
RV63, 66, 69
BG01, 02, 05, 07

Tuesday, November 24, 2020

MFT Sketch #516

Just a short little post to share my latest MFT card using "Snow Buddies".  I just started with MFT and been collecting a lot of their new stuff but I've seen this used over and over on Pinterest and elsewhere and just HAD to have it!  So so cute!!  

So I did a distress ink oxide background and added some splotches of white, silver and glitter ... it's sooooooo glittery and pretty in real life! 


I turned the sketch sideways and had a lot of fun with this one.

One thing I loved about this card was the new pink combo.  So super bright and cheery so here's my list of combo's used.  Really probably more for myself than anything.  🤣🤣

Hugs,
Eulanda

V12, 15, 17, 09
E31, 33, 35, 59, 79
RV13, 25, 29, 69
W00, 0, 01, 3, 5, 7, 9, 100
BV20, B0000, 0


Monday, November 23, 2020

Hang on Tight!

Hi there and welcome back!!  Today I'm sharing how to layer a card and my first tip is always to use papers from the same paper pack as they are made to coordinate.   


I always start with my image and I actually count that as one of my layers.  😀😂  Normally I have an image on quite a large piece of paper but lately I've really taken to cutting my images with my Brother Scan N Cut.  Love that thing!!!  

As you can see I have my image, 2 pieces of design paper from "Gnome For Christmas" and one more layer.  (Sorry peeps!  I just realized this paper is out of stock 🤦🏼‍♀️ but there is an amazing new Christmas paper pad called "Christmas Blessings" to check out.)  For my 3rd layer I've made a shaker and added some fluffy snow but then I added my hill and image to the outside of the shaker.  For the hillside I added some Snow-Tex.  Have you ever used that stuff?  It's so much fun and gives a plain piece of white paper so much more appeal! 


Today I'm using the new image "Hang on Tight" from the Winnie North Pole collection.  SO ADORABLE!!  Again I've used the Snow-Tex but this time for his hat.  Aren't the gingerbread and Rudolph cute too?! 🥰 I added some glossy accents to Rudolph's nose and stickles to the icing on the gingerbread men.


I created a sentiment from the "Christmas Tweetings" stamp collection and cut into 3 cute tags.  What do you think of my little sleigh?!  ha ha ha that was a quick last minute addition and I had to bend it a bit to make it flatter but I thought it was fun!  
 

I've die cut a couple of trees from the "Iced Winter Snowflake Tree Branches" and again, used the Snow-Tex.  And what do you think of my pom pom on Santa's hat?!  😂😂


Are you an embellishment kind of person or CAS?  I have such a hard time with CAS cards and normally take just as long to create one of those as a fully embellished card.  LOL!

Thanks for stopping by today!
Hugs,
Eulanda
___________________________________________________

Copics:

BG10, 11, 13, 18
W00, 1, 3, 5, 7, 9
E13, 15, 17, 19
E33, 35, 57, 79
YR21, 23, E15, 18
R22, 35, 37, 39
E50, 51, 53, 55
YG01, 03, 17, 28

Friday, November 20, 2020

Christmas Tweetings

 Today I'm going to share with you how to add small details to enhance your cards.  😀


I've used the new "Latte Christmas Tweetings" clear stamp set and started by colouring my images first.   Then I positioned them onto my slimline layer to see where I wanted to try and create the dreamy winter scene I had in my head.  Most times it never turns out the way I thought it would but this time it did!  I was pleasantly surprised!!  😂

I then used PD's "Snow Clouds" layering stencil and used my distress oxides to create the background.  Next I added some white splats using Winsor & Newton's gouache but you can use gesso or paint as well.  You could even spray your background with some water for a beautiful effect if you're using the proper paper.  Also, consider using black or another colour from your coloured images to add to the sky.  The fun thing about backgrounds and spats is they don't have to be realistic so have some fun with that!!  You could even make them ahead of time and then colour your images to match your background.  

For more details I've added snowflakes but I upped the look on them by using a glitter paper and then popping a sequin on top of it.  You could even double up your snowflake for more of a WOW factor if you like.  

I created the snowy hillside using glitter paper and that's also another step up from using plain white cardstock.  You could even try using plain cardstock and putting it through some kind of embossing folder first.  

For the images, I've used my copics and I could just leave it at that but this time I chose to add a little pom pom to the little bird on the far right.  😀 I even added some Stickles glitter to the birds hat but sometimes you have to be careful not to touch it on the black ink.  I've had where it will bleed a little but to avoid that, you could also use glossy accents and add powdered glitter instead.

I added some liquid pears to the center of the bunny's poinsettia on her hat and liquid pearls to the hat on the bird to the far left.  Also when I adhered some of the images I used foam tape and that gives it so much dimensional appeal.  

I didn't often use sentiments before my Polkadoodles days but there are so many that accompany these great stamps that I just felt they needed to be on the card somewhere and as you can see, it really did finish off the card.  So when you add sentiments, by adding that layer underneath, you have another way to step up your card.  Also add 3D foam tape ... add it to everything!!!  😂😂😂

On this card I made a mistake but I wasn't about to toss it into the garbage.  Sometimes you can cover something up by using embellishments.  Could you see where I made my mistake?  I accidentally added too much blue ink to the top under the penguin's hat.  When you look at the card overall, do you really see it?  Nope!  So I covered part of it by placement of the penguin and also the wooden snowflake.  A person could have also covered it with a sentiment so don't be in a hurry to junk your work.  If the mistake was made off to the left or right, I could have just cut the card down to make it a smaller version!!


So I hope I've given you lots of idea's to enhance your cards with.  I'd love to hear what you do to your cards to add extra dimension or texture.  

Have a great day and thanks for stopping by!
Hugs,
Eulanda

Sunday, November 15, 2020

A Holiday Treat For You

 Back again with another card made using MFT's sketch and this week I've used "Holiday Penguins" and made it into a shaker card! 

You know I don't know what these photo's look like when they get to you but on my screen, when I add them to blogger they lose so much resolution.  If you know why, or if it doesn't look like that on your end I'd love to hear from you.  I get so irritated when I have a beautiful sharp, clear and bright photo and it's changed once on Blogger.  Anyway, that's my rant for today.  LOL!

Here is MFT's Sketch #515!!


Thanks for coming by!
Hugs,
Eulanda

Friday, November 13, 2020

Christmas Tweetings Shaker

Here I am back again and I'm sorry but I just can't stop making shaker cards!!  😂😂😂 I'm going to blame the industry as it's very much promoting them right now and I'm falling for it.  ha ha ha!! 

My sweet image is from Christmas Tweetings and I coloured her up with my Prismacolour pencil crayons.  I added some Snow-Tex then Stickles glitter to her pom pom and hat then, popped her up on my shaker using some dimensional dots.  Behind my shaker, I've used a piece of design paper from the new Christmas Blessings 6"x 6" paper pad.  


To get the background in the shaker, I covered my paper using Distress Ink "Weathered Wood" for my background colour then let it dry.  I covered that piece with the "Christmas Trees" layering stencil and coloured it using the "Picket Fence" distress ink so I could get a decent white base behind the glitter I'm using in my next layer.  I thought if I covered the weathered wood background I had, the glitter gel might not come through as solid as I wanted. 


After my picket fence distress ink dried, I added the glitter gel to the stencil.


The sentiment is also from the super cute Christmas Tweetings stamp collection.  I've cut the strip and then curled it with a pencil to give it more dimension.  I glued the right side of the strip but then added a dimensional foam dot under "YOU" for even more dimension cuz that's what I'm all about.  Texture and dimension!  😀💕


I hope this little post gives you some idea's on how to use the new stencils in the shop because they are sooooooooooo awesome!!  Do you like using stencils when you create?

Thanks for stopping by today!
Hugs,
Eulanda

Tuesday, November 10, 2020

Warm Hugs & Frosty Kisses - MFT

Well as you can see I'm really enjoying MFT stamps.  I'm liking the simplicity of being able to make a super cute scene, not quite like my fru fru cards.  LOL!  There's a place for those so I won't stop making them but I will start making less.  I also like to focus on the image and the colouring and let that stand out instead of the embellishments.  Not always and I will sometimes share cards that have an amazing image and embellies but both work.  

Today I'm sharing a card using MFT's "Warm Hugs & Frosty Kisses" stamp set.


I'm entering MFT's sketch challenge #514.  Can you even imagine have over 500 sketch challenges?!!  WOW!!  

Thanks for stopping by!
Hugs,
Eulanda

Monday, November 9, 2020

Snowball Kisses

I'm sharing another shaker card with you because I am seriously hooked!!!  😀😀 The first thing I did was add some distress oxide ink to the pretty "Snowflake Flurry" stencil for the wintery background.  I covered the finished background with my acetate, filled it with shaker contents and then proceeded to complete the card on the outside of the shaker.  


I'm using an image from the super cute new "Snowball Kisses" stamp set and this one I've coloured up using my Prismacolor pencil crayons.  I'm not sure if you can see it but I've added glossy accents to give his ski goggles a shine.  😂😂


The "Merry Christmas" sentiment is also from the same collection.  


I felt like I need just a little bit more for my scene so I added a stack of pom pom's to the lower left corner.  Hee Hee .... he's ready for a snowball fight!!  


Here is a video of the shaker.  I found the shaker material a little tight in this particular card so next time I will take into consideration the height of all my contents.  I don't usually need to add a double layer of 3D foam but that might be an option I would consider next time.


I hope today's card has helped inspire you to get crackin' on those xmas cards.  They really are my favourite to create but what about you?  What are you favourite cards to create?

Hugs,
Eulanda
_________________________________________________

Prismacolor Combo's
Canary yellow, sunburst yellow, yellowed orange, mineral orange, pumpkin orange, chocolate
Spring green, apple green, grass green, dark green
Light aqua, aquamarine, cobalt turquoise
Jade green, muted turquoise, slate grey


Wednesday, November 4, 2020

MFT Sending Christmas Joy

Sharing a card I made a few weeks ago and the recipient finally got it.  It was a challenge a friend put out to me on how I would use this die from MFT "Sending Christmas Joy".   I do have a few more idea's in mind for this one!  I also used the relatively new release "Present Time" snowmen.  They're so cute!

I wanted to make the sentiment really pop so I used 4 layers of 120lb cardstock.


For the last layer I die cut one layer using some white glitter paper.  OOooooooo ... aaaaaaaahhhhhhhhhhhhh!  😂😂


The background was really easy because I already had it made.  LOL!!  What a cheater huh?  At first I thought so too, then I thought "work smarter, not harder".  One day I made a bunch of different distress ink backgrounds.  I'm running low so it looks like I need to do it again soon!  

Enjoy your day!
Hugs,
Eulanda
___________________________________________________

Copics:

RV13, 25, 29, 69
YG03, 63, 67, G99
E31, 33, 34, 35, 37, 47
W3, 5, 7, 9
B32, 34, 37, 39
Snowmen - BV20, B0000, 0

Sunday, November 1, 2020

MFT Merry & Bright

I wanted to play with a new set of stamps I got from MFT called "Cozy Companions".  Honestly I really only bought it for the fireplace.  LOL!!  It turned out to be a really great masculine xmas card just by adding some garland to the staircase (my sister thought the top angle cut is where you'd be walking up the stairs - 😀) and some fireplace decorations.  Well and the addition of the "Merry & Bright" sentiment just set it right off!  🎄

Again I decided to join the MFT sketch challenge #513 with a few little tweaks of my own.


Are you getting your xmas cards ready yet?  
Thanks for peeking!!
Hugs, 
Eulanda