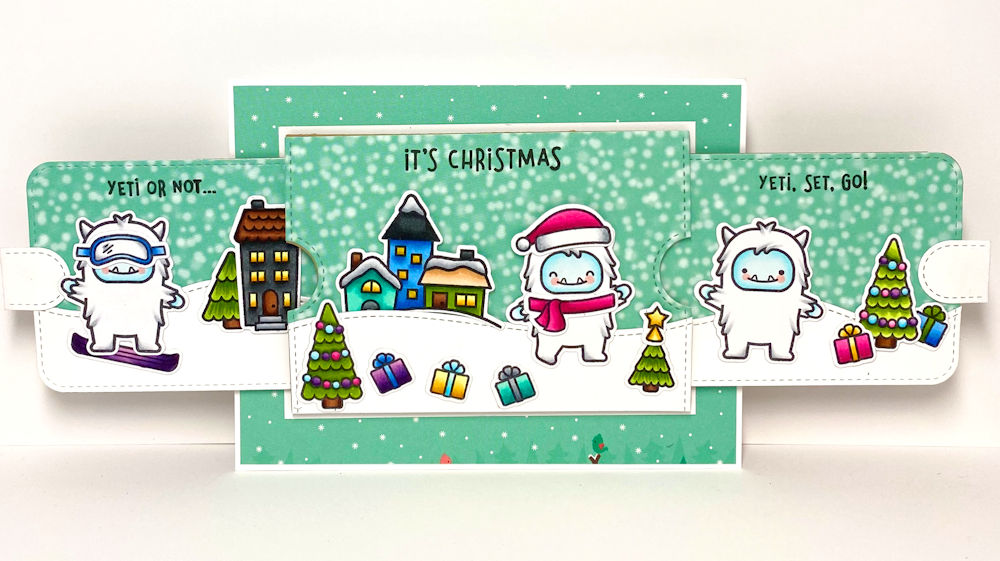
I LOVE THIS CARD!! I had soooooo much fun creating it because while I was doing it, it took me back to my childhood!!! At one point you really could believe this existed.
My card is an 8" x 3" and I really enjoy these wider scenes so they'll be more to come of those. 😀
The cabin is just plain and I thought it needed more texture so I created and colored in the logs with my copics.
Don't they look like a happy little gingerbread family?!! LOL!!
I know I keep saying it but THIS WAS FUN!! My first "Double Slider Surprise"!! The 2nd picture explains it all. I got a chance to play with the super cute "Yeti or Not" stamps and dies as well I added houses from the "Winter Village" set of stamps and dies. At first I thought the dies were just a waste of money BUT NOW I GET IT! 😂😂😂 Makes it so much easier and quicker to get these little guys onto a card. And honestly, I first thought these would be simpler and quicker than my other fancy cards. NOPE! They're not!! 😂😂😂 I suppose if I just stuck to a couple images on a card it might be buuuuuuuut ummmm I like having lots. Are you really surprised? 😏😏
TA-DA!! Surprise!! Now there's a whole Yeti village scene!! I've used LF's Snowday Remix papers and the Stitched Hillside borders to help create my outdoors theme.
Isn't this just stinkin' adorable?!! Have you made a slider yet? Did you find it easy? I really liked Lawn Fawn's video tutorials. They helped out so much!
Here is a quick look at how this slider works on my You Tube channel:
Thanks for coming by today! I hope you liked my slider surprise!
I thought I would share just a quick and easy shaker card I created awhile ago. I put off blogging it because I've taken a ton of photo's and found it very difficult to take a picture of acetate on the shaker part because of light reflection. Anyway, I think I finally have it figured out. Not for my video tho. LOL!! (palm to forehead)
IT WILL NOT STUMP ME FOR LONG!! 😂😂
I've used Lawn Fawn's "Mice on Ice" and Whimsy's "Peekaboo Window Die 3" and "Celebrate Word and Shadow Die" set.
Today I'm sharing a card that could be used for just winter or Christmas. I started with Lawn Fawn's Snowday Remix papers and then die cut a layer using the Leafy Tree Backdrop. It's an easy and quick way to get your card started and I love that! I chose the characters from the Yeti or Not stamp and die set and also cut the snowflakes from the Winter Skies stamp set.
Can you even fathom eating a snow cone or iced treat in winter?!! Brrrrr!! Me either but what's your favorite?!! I think the Reese's pieces ice cream bar is my absolute favorite but I'll eat that indoors thanks very much! 😁
Thanks so much for stopping by!
Hugs,
Eulanda
Y35, 38, E15, 18
B0000, 000, 01, 02
RV10, 02, 04, 06
V12, 15, 17, V17
E35, 37, 29
YG01, 03, 23, 63, 67
PRE-HOLIDAY SALE EXTRA 10% OFF COUPON CODE HOLIDAY2019 +FREE GIFT
I LOOOOOOVE THIS CARD!! Even tho it's not my design it's still one of my favorites. When I saw Antonia Florence from Taffleberry Lane do this, I knew I just HAD to try it for myself. It's a smidge different but it was fun!! I started out by coloring everything with my copics and funny how I thought it would go quickly cuz they're small.....well they didn't. LOL!!
Then I created my background using distress oxide inks and paint for the splatter. After that I cut all my light and rooftop dies and created my card. I used some Snow-Tex for more snow texture but next time I'll add some glitter!!
For my lights I punched the individual lights and then colored them with my copics. I added Stickles over top and then glossy accents for a 3D effect and WOW do those suckers pop!! I think it's my favorite part of the card!!
I hope you enjoyed this card as much as I did. If you have any questions please let me know and thanks for popping by!
My first time using my Zig markers! Fun but still a lot to learn I think! 😀 I’ve created my card for Lawn Fawn’s “Cards For Guys”challenge,
although I think it would be a great Christmas card for anyone. Aren’t the singing penguins CUTE?! "Here We Go A-Waddling" set along with LF's "Little Town Border" and "Stitched Hillside Borders".
And what about those "Mini String Lights"? I glittered those up using Stickles and then added some glossy accents to them to make them POP! Jeepers in hindsight I think next time I'll cut the lights from some glitter paper that I just realized I have. Annnnnd that's the problem with stash folks!! LOL!!
For today's post I'm sharing my latest, creating a card for Lawn Fawn's challenge of a sketch.
Again I've used my distress ink oxides to do the sky with wilted violet, chipped saphire and black soot. I seem to really like that color combo.
Even tho I'm quite new to Lawn Fawn I did pick up some of their older sets so today some of these pieces are from "Winter Skies" and the little bear is from "Beary Happy Holidays". Oh and the "Joyful" sentiment is from the new "Mice on Ice" stamp set.
I hope you enjoyed my little card today. It's tough trying to do CAS cards but I'm loving it! LOL!
EEEEEeeeee heee heeee I am having SO MUCH FUN with the Lawn Fawn items!! I've done all kinds of things to this card today. I'm learning so much by other people's creations it's so inspiring!!
For this card I've use Ho Ho Holidays stamp and die set and the Winter Village stamp and die set. I started out by creating my background using distress oxide inks of wilted violet, chipped sapphire and black soot. Then I flicked on some white and black paint - a technique that is still very messy to me but I'll figure it out!! After that I distressed the edges using the regular distress ink (black soot) all the way around. I like the nice vingette glow it gives off that the oxides can't do.
I added a black forest border to my white hills and also tried to use my white gel pen but that thing is a hunk of junk!! I can't get it to be consistent at all! I have tried every little trick out there to get it to work. Maybe I have to use it every day I'm not sure.
Anyway there you gave it!! Now off to work on my next one!!
MY FIRST REVEAL WHEEL!! Ok ... so!!! I learned a few things along the way that's for sure! Even after watching a few different video's there was still a couple of glitches but we can hide those!! LMBO!!! And thankfully, foam dots can be taken off and they don't REALLY wreck anything. LOL!!
Each photo has a different view in the window and that's where the reveal wheel comes in.
So this is the Build A House die I've used and I even drew in the bricks for some more details.
My background is created using distress oxides annnnnddd sorry I forget what colors I used. I think it was wilted violet, chipped saphire and black soot. I also used distress ink black around the edges. Seems like a more finished look.
I did some black and white splatter painting, which is still being practiced. I'm trying to figure out how I can NOT get paint EVERYWHERE.
And there you have it and more to come!!! It didn't scare me off too badly. No pun intended. HA HA HA HA!!
I'm back with a couple of Lawn Fawn cards using the "Thanks A Latte" set. Sooo cute but I will tell you one thing, I didn't buy the dies for this set only because they weren't available at the time I purchased the stamps but HUGE REGRETS!! So I will be on the search for those soon. I cut every little piece on each card so ya, there goes an hour of time I'm sure. LOL!!
For both cards I used Lawn Fawn's "Fall Fling" 6" x 6" paper pack. Soooooo adorable!! On this card I used Lawn Fawn's "Reverse Stiched Scalloped Square Windows" to help layer up the card. I distressed my background using carved pumpkin, ripe persimmon and rusty hinge oxides.
And on both cards I've also used Lawn Fawn's "glitter pen". It's soooo soft but really pretty up close.
It's National Card Making Day so I hope you're in your craft rooms or better yet at some fun crop or something. Enjoy!
HOW FUN IS THIS?!! I've used Lawn Fawn's "Spooky Village" stamps and die cuts. Creating a scene was great relaxtion but I'm not gonna kid you it took me a long freakin' time! But that's ok because who doesn't like to just stick around in their craft room all day?! ME!!!!! YAY!!
I was going to say here's my favorite cluster of the whole card but ummm....I don't think I can pick a favorite. They're all awesome!!
I've used the following distress inks to create my sky:
WELL!!! I discovered something new this week!! LAWN FAWN! OMG they are so super cute ...... ummmm and addictive! WHAT THE HECK?!! Anyway, I wanted to play with something else as I feel like my style has just become the same ol, same ol. Don't get me wrong, I still love it but I want to do something new with different techniques. The first thing that has hooked me is this super cute "Flippin Awesome" interactive card.
WHAT?????? How did I not know about these things?!! I'm finding there's a few things like that lately. ha ha ha!! Well, here is my first ever Lawn Fawn project and it won't be my last!!
I've used a cute little Lawn Fawn clear stamp and die set called "Mice on Ice".
I also used Lawn Fawn's "Flippin Awesome" and the "Awesome Add-on". That was a bit of a learning curve but there are a ton of tutorials on it out there. Hmmm...maybe I should make one too!! YUP! Coming soon!! hee hee 😀😀
It was a little hard for me to do something simple and then just leave it but it was fun for sure!! I think I could get use to this! Normally when I create a card I start out coloring on a different day and it takes a few hours. I follow up later with the card and that also takes anywhere from 3 hours and more so this was nice to have something done in the same day. LOL!
And now that I know how this is built, it should get put together a bit more quickly. I also spent time taking apart all my dies while I made this. Oh yup....you get all these little dies attached to start with. Now I just have to come up with a way to store them. Still thinking on that one. 🧐
I did make a mistake on this one and that was not finishing this last flap that says "Joyful" but managed to stick in one last scene. Ah it worked out!!
I hope you like it!! I know it's completely different from what I usually do but it was fun for sure! Ok I know I said that already but really...IT WAS!