Wednesday, February 26, 2020

Ula Swishy Tail - Clear Polymer Stamp set

When I first started this ocean themed card I had no idea where it was going to take me but by using layers and more layers, I'm extremely happy with the end result.


The very first thing I did was color up this image, (Ula Swishy Tail available as a clear polymer stamp set) using my Prismacolor pencil crayons and picking some papers to match.  I've used pieces from Starfish & Sandcastles and Mermazing Ocean but have you seen all the ocean themed digi papers in the store?!!  MERMAZING!!!  The selection is 😲!!

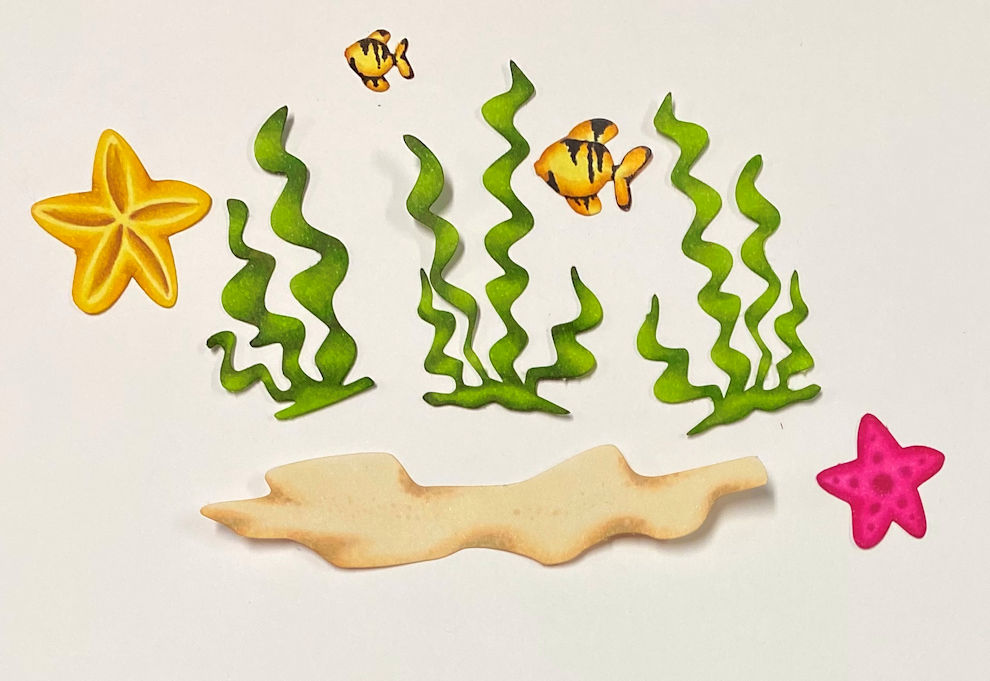
I found some ocean pieces and cut them with my Silhouette, then colored using my copics.


I figured I needed a nice big anchor so I cut one, again using my Silhouette, then I covered it with a paper using the Mermazing Ocean again.  Starting to really love my Silhouette lately and am using it more for things like this and oooooo shaped cards!!  You still can't beat the quick use of a die tho.


Here are where my layers start, adhering pop up dots for each.  As I added the 2 pieces of ribbon to the middle layer, I realized that now, the top layer will have to be higher but this allowed me to sneak the hemp netting under the top right layer so it worked out perfectly.


Here you can see a side view (which you wouldn't notice unless you deliberately flip it on it's side) and by the time I added some hemp netting to my anchor, it's about 1/2" high.  No, it's not ideal for mailing but sometimes you have that special person who you can hand deliver to so go nuts with layers!


Because this card has so many built up layers, it allowed me to add some real seashells.  That was great because I've had a stash of those FOREVER!!  I even got to add a fair size clear gem as well.  More stash.  🤣


I hope you've enjoyed my card for today!!  Do you make layered or CAS cards and which do you find easiest if you do both?  I do both but YIKES, I find CAS cards very challenging!!  That's an incredible talent all in it's own.

Thanks for popping by!
Hugs,
Eulanda

Prisma's:
Skin: White, Light Peach, Peach, Burnt Ochre, Chocolate
Eyes: Spring Green, Apple Green, Dark Green
Starfish: Deco Pink, Hot Pink, Process Red
Hair: Non-Photo Blue, True Blue, Violet, Dioxazine Purple Hue
Tail: Cobalt Turquoise, Aquamarine, Light Aqua, Non-Photo Blue, True Blue, Violet, Dioxazine Purple Hue
Shell: Beige, Light Peach, Salmon Pink, Burnt Ochre
Seaweed: Canary Yellow, Sunburst Yellow, Goldenrod

Wednesday, February 19, 2020

PD's Holly - Ladybird Tree

Good day!!   Are you ready for spring?!  I AM so today I'm sharing my quite-like spring card!!!  I've used this beautiful image from the Holly collection called Ladybird Tree.  Eeeeeee how cute are those little teeny ladybugs?!!  💕💗  


Today's papers are some digi papers from the Work Play 10 bundle.  I just have one word to say about these papers.....WAUW!!!!!  I do have a 2nd piece peeking out from under the brown tassels but like anything, I usually hide stuff.  🙄  I'm working on that.  LOL!


This sentiment comes from the Sentimentals 6 x 6 paper pack and I die cut it using a die from the Posydoodles Tags set.  Boy that pack is extremely useful as it comes with so so many sentiments to choose from.  I also die cut a 2nd tag and layered it under my sentiment using more of the digi papers.


And since it's a spring-like card, I just had to use one of the dies from the Butterfly Trio set.  I popped on an "oh so pretty" gem that sparkles beautifully and actually came through quite nicely in the photo.  Hey!  Don't you think that would be a great name for an embellishment manufacturer?  "Oh So Pretty"!  Any line of crafty stuff really!  🤩


I've also layered in some fabulous ribbons from my stash.  I love love adding ribbon and lace.  What about you?  What's your favorite embellishment?  I'm not sure I have just one but I think it would be ribbon/lace and flowers.

Thanks for popping by today and hang in there winter peeps.  Spring is right around the corner!!  YAY!!!  😄🥰

Hugs,
Eulanda


Thursday, February 13, 2020

Polkadoodles Holly "Hello Pretty"

Remember these from waaaaaaaaaay back when?  Well I'm not quite old enough to have experienced them but I did know they existed.  Probably from the movies or something.  This svg file, by Lori Whitlock, came across my email a bit differently but it inspired me to create this version.  The original file just used plain paper but I thought I would spruce it up a bit and use some pretty pink from the Sweet Tweet paper pad.


I started out with the fence and decided it needed a wood grain look and here is how I did that.  Stencils can be really fussy I've noticed, so I used some washi tape to adhere it down.  It helped not move around so much.  YAY!!  


Here are all my pieces before assembly and as you can see I've distressed almost all edges using gathered twigs distress ink.  I printed and then cut my image using my Silhouette from the new Holly collection called "Hello Pretty".  Notice I didn't bother to color her below her skirt?  I started to and then realized you won't see her anyway and in fact, I ended up cutting off her legs.  GASP!!  IKR?!!  I almost got sick cutting into an image half colored.  🤣🤣🤣


I'm sharing this photo so you can see that you can lie it flat in case you'd like to mail it.  Bonus!!  I die cut some grass using a green colored sheet from the Bright & Beautiful 6 x 6 paper pad.  


I haven't done a little project for quite some time as it's been mostly cards so this was fun!!  I don't normally make Valentine's anything but I sure enjoy the chocolates!!!  🍫  What about you?  Do you make cards for Valentines?

Thanks for stopping by!!
Sending Valentine's hugs to everyone!  💗😍
Eulanda