Friday, September 27, 2013

Live and Love Crafts - The Great Whites

This week at LLC we were challenged for sure!!  At first when I saw this inspiration theme I was freaking out as I've always avoided it but now that I've done it heck it's EASY!!  GREAT WHITES!!  You don't have to balance out any colors so what was my dilemma?!  As long as you have lots of texture it works!

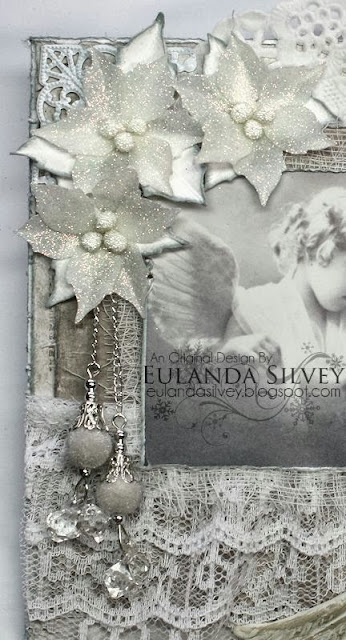
I've used Maja Design's "Vintage Summer Basics" papers but I always get such a kick outta myself when I use summer or spring papers for winter or Christmas.  hee hee!  I used another image from Inkido's "Vintage Angels" collection and distressed it as well as every layer.  


Don't you just love these white poinsettia's?  I used a Magnolia doohickey but before I used the die I added some double-sided tape to some vellum.  After I made my cuts I peeled off the tape and dipped the piece into some GlitterRitz but any glitter will do.  I added some Frosted Berries for the center which already have a bit of a shimmer to them.


Wild Orchid Crafts flowers and shabby chic bows are an easy extra embellie to any card.  Ok not that it was easy to think of something to add in that blank space but it was easy to add because it doesn't take long to make up some bows and add some flowers.


This big embellishment piece was FUN!!  The wings are from Live and Love Crafts called "Heaven Sent".  I added a teardrop pearl along with some more flowers and some foam flower buds to finish it off. 


Have you seen all the new embellishments in the store?  OH MA GOSH!!  How to refrain from getting one of each.  LOL!!  And the new paper that's out from Maja Design?!  Oooooooo I can not WAIT to start playing with that!!  Gorgeous!!  Hopefully by the time you seen this post, she's gotten her shipment in.


Thank you so much for stopping by!!
I really appreciate the visits.

Monday, September 23, 2013

LDRS - Snowflake Wonder

Today I'm sharing a card I made using Little Darling's Rubber Stamps "Snowflake Wonder" from the new CandiBean line.  This line is soooooo sweet and there are 10 new cute images to choose from.  The paper is also available at LDRS called "Frigid Fun".  


The sentiment is new as well, from the collection also called "Frigid Fun".  I got my teamie to send me a Joy Crafts snowflake border (thanks Tracy!) and embossed it with some gold and shabby white Frantage. 


I also added some gold and shabby white Frantage to my chipboard snowman after adding some Ranger crackle paint and distressing the edges.


Don't you hate it when you have drawers filled with flowers but you can't match any to your image?  So what do you do?  

I used 2 Copics and added the lighter color to the inside of the flower petal and then just painted the edge with the darker color.  After that, add some drops of blender solution to petals and it will blend itself...although on this one you can't really tell I had used 2 colors but it usually works. 


Thanks for stopping by!!  I hope I've helped inspire!! 

Have a great week!

Friday, September 20, 2013

Live & Love Crafts

This week at Live and Love Crafts the ladies have been playing with the Melissa Frances resin pieces.  They are super gorgeous and what an amazing collection available at LLC and even some new stuff!!  

I thought about one of the biggest resin pieces I have and immediately went to the little cherubs and found a matching vintage image from Pion Design's Gramma's Attic "Christmas Time".  I was trying to avoid covering up that oooooooooh so gorgeous "Alençon" lace.   I've also got some jute layered under the Madame de Pompadour lace for texture.


I don't normally use a lot of foilage on my bouquets and was determined to start when I saw some new dies from Noor Design.  I asked my teamie to send some over since I wasn't sure where to find them and no problem!  Thanks Tracy!!  I love them!  Once you add some gorgeous Kort and Godt rolled flowers, Melissa Frances pearls and some Magnolia vintage berries....WELL!  OH MA GOSH!  I might have to try this a few more times.  I LIKE IT UH-LOT!  (Jim Carey anybody? hee hee)


I managed to sneak in another resin piece with SANTA!  Maybe more appropriately "Father Christmas".  hee hee  I cut the image from a tag from the Maja Design "It's Christmas Time" collection.  Actually same with the numbers too.  I added a little shabby chic ribbon, flower and VOILA!


Here you see some of those oh so pretty Wild Orchid Crafts flowers that LLC now carries.  Love them hip rosebuds and I don't use them much but I might start.  They sure finish off a bouquet rather nicely don't you think?


So that's what I have to show you for this week.  If you haven't had a chance yet, I have to tell you, it's a must see at LLC's inspiration blog this week.  Oh who am I kidding it always is!!  ha ha ha!! 

OH AND also I have to tell you to check out the new pretties that are in stock.  Just click on NEW/Restocked.  There are some wonderful things there.  ENABLER ALERT!

Thanks for stopping by this week.  I love sharing with you guys and hopefully inspire you as well.  Have a great weekend and HAPPY CRAFTING!

Sunday, September 15, 2013

See You Around


I could just cry!!  One of our favorite, sweetest and most awe inspiring crafters has chosen to leave the crafting world to spend more time with her family.  However, that's THEE BEST reason I could ever think of and I'm so super happy for her.

We've been on a few teams together but the most recent one was Live and Love Crafts and no matter what team she was on, she always brought her A game!!  And what a game she has!  A complete style all her own but so gorgeous!  Her mind shows no boundaries.  I mean this is something I would NEVER have thought to do!  Seriously how incredible is that?!! 


Look at these!!  More of Louise's GORGEOUS creations!  My eyes were always satisfied when I came to your blog.  So much wonderful eye candy there.  I have plans of going to save a bunch of her cards to my Pinterest then when I get stumped I have all of them in 1 place.  


Today the DT from LLC has some farewell messages and cards for her and this is mine.  So Louise, I decided to make you an actual sticky notepad easel card.  This way you can have it out year round if you like!!  I tried to channel my inner Louise and use pinks, flowers and softness because to me, that's a true Louise card.  hee hee 


It's not super easy to get a perfect picture of this because the camera wants to focus on only part of it (I still need camera practice) but Louise, you'll be able to inspect it IRL.  The nice thing about sending something to a fellow crafter is that if something falls off in transit, you know the recipient can fix it.  hee hee!

So, please join me in giving Louise a standing ovation from around the world for all her amazing inspiration and contribution to our crafting world.  We will miss you terribly but are so happy for you and your future.  I'm sending you a big warm hug from Canada and "saying see you around".  I can't stand to say GOODBYE so I'm not.  No way uh-uh.  LOL!  MWAH!

Sticky Note Easel Card Tutorial

Welcome to my tutorial!  This is very picture heavy but I think that's best when it comes to a tutorial because a picture is worth a thousand words?  Right?  I hope?  LOL!

So I've seen these made but I never could find instructions.  I know one of them was a class being taught in real life but I think it was half way across the world.  Dang!


The trickiest part on this card is the binder piece and the hardest to explain so if you have any questions please don't hesitate to comment.  Also, it may make a lot more sense when you're actually making it instead of just reading it.  It also helps if you've already made an easel card but for reference if you'd like to see one check on Splitcoast.

I wanted this easel card thick enough that when I sent it, I could lay the top piece down and not squish anything in between.


So we start out with these pieces:  


Then I scored 2 out of 3 pieces.  The 5 1/2" x 5 1/2" is your canvas.  hee hee  Where you'll build your beautiful card!


Now add any layering that you want to each piece as shown...sorry got ahead with the box but see the next picture for instructions.  The 3 center panels will be adhered together like an accordion...if that makes sense. 


Now cut each corner and punch hole using any punch in your collection.  I used a 1".


Now we want to assemble the base:


It doesn't matter if you adhere the front or the back first. 


This is how the front should look once adhered all together.  So in order to use only a 12" x 12" sheet and make it work, I had to take a bit off the piece that will be used to glue your 5 1/2" x 5 1/2" card to but I promise it works.


And when you flip it over this is the back.


Ok so I'm not sure how to describe adhering your 5 1/2" x 5 1/2" piece onto the base but when you do, the best thing is to lay it down BEFORE gluing so you can see where it should lie.


When you finish, you will be short a few inches...dang sorry I didn't get that measurement.  But when you close the card, it should all lie perfectly square.  I hope as you build this, it makes more sense also refer back to the picture at the top where it's folded up.


If you have any suggestions of anything I can add to make it easier please let me know.  I do have the pictures from the card but not the card anymore.  LOL!  I'll do what I can.  :)

Thanks for stopping by and if you use my tutorial I would LOVE to see yours.  Just leave a comment with your link.  That would be great.  Hope it's useful!