Showing posts with label Shaker. Show all posts

Friday, September 10, 2021

Krista Smith Stamps "Birthday Girl"

Do you remember Saturated Canary?  The artist was Krista Smith and although that company doesn't exist anymore, as an artist, she is still creating and selling and I've always loved colouring up her images.  I found time to colour again!  YAY ME!  🤣🤣🤣

It's very rare that I colour something twice, not because I don't like it but because I don't normally have time.  Being a part of design teams for so long has me pushing along with all their new images, which I love!!  However, these were commissioned cards and this is what she chose!  

This image is called "Birthday Girl" and you can find her here on Krista Smith Stamps Etsy Shop.  

I've coloured her up using my copics and in this case the customer asked for a blonde with blue eyes and her favourite colour is lime green.  This was a challenge but I like how it turned out.  😀. Both are shaker cards as well.  Just some fun interaction for the recipient.  

And this one was for a recipient with brown hair, blue eyes and favourite colour being purple and turquoise.  I love this combo!
And this is the first time I have ever duplicated a card as close as this but the customer was short on time.  Thankfully the girls live in different cities so they'll never see each other's cards.  LOL!  And the customer was happy!!  That's what counts!  😀💕

Thanks for stopping by I hope you liked my creations for today!!
Hugs,
Eulanda

Sunday, April 25, 2021

Polkadoodles Flying High

Today I'm sharing how I've used stencils to create the shaker box layer. 


In order to create the base I've used some Ultimate Graphic 160gsm paper pack and printed a design paper from the Eden Collection - Paper Heaven 1-10 digital craft bundle and cut with a scalloped slimline die.

I started the shaker creating a heart filled sky by using distress oxide inks and the Hearts & Circles Layering Stencils like this:

Layer 1 - Circle stencil with Spun Sugar

Layer 2 - Larger hearts with Kitsch Flamingo

Layer 3 - Small hearts using Picked Raspberry 


I then added my shaker contents and some clouds so I could pop my image right on top.  I coloured up You're Flying High digi stamp using my copics then adhered a double layer of foam tape to really make her pop.  She's also available pre-coloured for those occasions when you might not want to colour or need a quick card!


The saying was created using 2 stamps from the Super Sentiment stamp pack that contains 49 clear polymer stamps.  Tons of great words to create any sentiment for your projects!!


Thanks so much for stopping by!
Stay crafty!!
______________________________________________________________
Copics:

C00, 0, 1, 3, 5
BV000, 02, 13, 08
RV13, 25, 20, 69
Y00, 11, 15, YR23, 24
Y11, 15, 17, E15, 18
E000, 00, 04, 11, 21, R20

Sunday, March 7, 2021

Stamping Bella - Curvy Girl Baker

I have to say I think this is one of my personal favourites lately. 🥰  I’ve created a shaker card and added some super cute clay lady bugs with some sequins and micro silver balls for the contents.  The image is Curvy Girl Baker from Stamping Bella and I think the sentiment is just so perfect.  I can eat cake anytime…even for breakfast.  LOL!  What about you?  


The papers are Frozen Roses from Ciao Bella and such pretty papers they are!  


I decided to dress up my card photo's with just a couple of extra's from my scrapbook program.  I used an online program to take away my original background and then added the background paper, sequins and ric rac ribbon embellishments.  I just wanted to try and up the ante so to say but I hope you like it!!  Figured it would be easier than actually finding all those pieces to match each card.  LOL!  

Thanks for stopping by!

Have a great week!
Hugs,
Eulanda

Friday, February 26, 2021

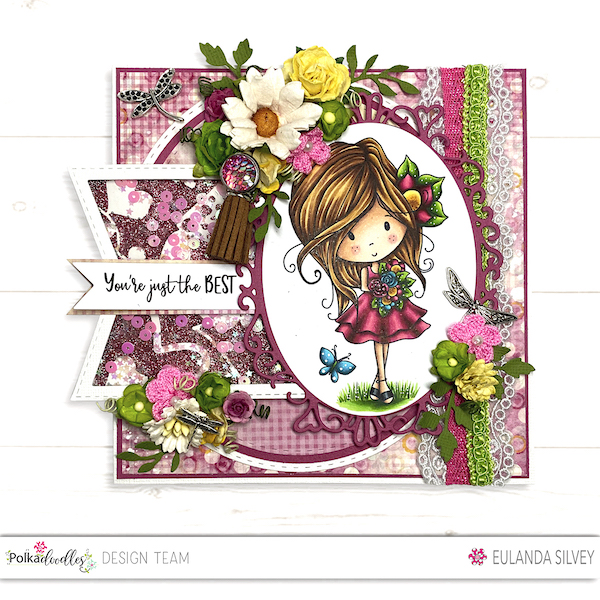
Winnie Sunshine Delight Bouquet

Welcome back!!  Today I'm going to show a behind the scenes look at my card.


I feel like I'm pulling back the curtain in the Wizard of Oz!  🤣🤣 I started by printing out my papers from the Winnie Sunshine Delights Paper Pack 1 download using the Ultimate Smooth paper.  I know I rant and rave about this paper every time but honestly it's amazing!  I love it!!  I cut my layers using a round die for the very bottom of the card and then I added 3 layers of ribbon from my stash.  


Next I created a shaker element using the Timeless Rose Sweethearts stencil, covered with some bubble gum glitter gel and then added all my shaker contents. 


I've used the black and white digi Winnie Sunshine Delight Bouquet and coloured her using my copics.  This image is also available as a pre-coloured if you'd like to save some time and make a quick card!  I cut the image into an oval shape so it would fit perfectly in the Elegant Nest set of 3.


After all was layered up I added all my extra's and TA-DA!  Done!  I wish it was as quick and easy as TA-DA sounds like.  🤣🤣 It does take me awhile to create these cards but I love the process as I don't think about anything else but what I'm creating.  Great escape!!

Thanks for stopping by!
Hugs!
Eulanda
______________________________________________________

Copics:

Y11, 15, 17, YR21, 23
BG01, 02, 05, 07, 09
YG01, 05, 07, 17, G28
RV13, 25, 29, 69
Y21, 23, E15, 18